Difference between revisions of "How to build your first house/pt-br"
Luizsabino (talk | contribs) |
Luizsabino (talk | contribs) |
||
| Line 10: | Line 10: | ||
Pronto! Você deverá aparecer em um novo mundo. No entanto, não há nenhuma construção. Por padrão, a tecla <kbd>W</kbd> movimenta você para frente, <kbd>D</kbd> para a direita, <kbd>A</kbd> para a esquerda, e <kbd>S</kbd> para trás. Para girar, olhar para cima e para baixo, simplesmente movimente o mouse. | Pronto! Você deverá aparecer em um novo mundo. No entanto, não há nenhuma construção. Por padrão, a tecla <kbd>W</kbd> movimenta você para frente, <kbd>D</kbd> para a direita, <kbd>A</kbd> para a esquerda, e <kbd>S</kbd> para trás. Para girar, olhar para cima e para baixo, simplesmente movimente o mouse. | ||
| − | == | + | ==Primeiros Recursos== |
| − | + | Agora que você sabe como se movimentar, precisará encontrar um pouco de madeira. Caminhe ao seu redor até que você veja uma [[Trees|árvore]]. Elas tem o [[Tree|tronco]] escuro com [[Leaves and Jungle Leaves|folhas]] verdes em volta dele. Caminhe até o tronco e olhe para ele. Quando estiver perto o suficiente, você deve ver uma linha preto em volta da seção do tronco em que você está olhando. Agora, você precisa manter pressionado o botão esquerdo do mouse. Você deverá ver rachaduras aparecendo na árvore. Após alguns segundos, a parte do tronco que você estava vendo irá desaparecer. Agora, você provavelmente irá ver isso na sua mão. Se você pode ver uma pequena imagem de parte da árvore em uma da caixas na parte de baixo da tela, isso significa que o bloco está no seu inventário. Estas caixas são sua [[hotbar]]. Para selecionar os diferentes itens em sua hotbar, utilize a roda do mouse ou digite os números de <kbd>1</kbd> à <kbd>8</kbd>. | |
| − | [[File:Inventory menu illustrated.png|thumbnail| | + | [[File:Inventory menu illustrated.png|thumbnail|O menu padrão do inventário]] |
| − | + | Para abrir seu [[inventory menu|inventário]], pressione a tecla <kbd>I</kbd> em seu teclado. A tela deverá The screen should now have several rows of grey boxes on it. These are the various slots of your [[inventory]]. To move items around, left click on them with the mouse, then click where you want to put them (an empty box). | |
Now, break some more bits of tree. You should now see a small number next to the tree picture in your inventory. This indicates how many pieces of tree you have. | Now, break some more bits of tree. You should now see a small number next to the tree picture in your inventory. This indicates how many pieces of tree you have. | ||
Revision as of 23:44, 6 November 2015
| English |
Este tutorial mostrará a você como criar um novo mundo, construir uma casa e colocar luz nela.
Iniciando um novo mundo
Antes de tudo, com o Minetest aberto, você deve criar um novo mundo. Faça isso clicando em “Novo ou New” na tela inicial. Tudo que você precisa fazer é digitar um nome para seu novo mundo. Então clique em “Criar ou Create”.
Agora que você criou seu mundo, você precisa jogar. Selecione seu mundo clicando no nome sobre a lista e depois clique em "jogar ou play". Você verá uma barra de progresso mostrando o carregamento do seu mundo. Isso pode levar algum tempo dependendo das especificações do seu computador.
Pronto! Você deverá aparecer em um novo mundo. No entanto, não há nenhuma construção. Por padrão, a tecla W movimenta você para frente, D para a direita, A para a esquerda, e S para trás. Para girar, olhar para cima e para baixo, simplesmente movimente o mouse.
Primeiros Recursos
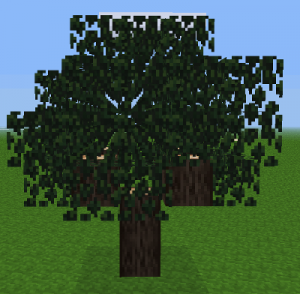
Agora que você sabe como se movimentar, precisará encontrar um pouco de madeira. Caminhe ao seu redor até que você veja uma árvore. Elas tem o tronco escuro com folhas verdes em volta dele. Caminhe até o tronco e olhe para ele. Quando estiver perto o suficiente, você deve ver uma linha preto em volta da seção do tronco em que você está olhando. Agora, você precisa manter pressionado o botão esquerdo do mouse. Você deverá ver rachaduras aparecendo na árvore. Após alguns segundos, a parte do tronco que você estava vendo irá desaparecer. Agora, você provavelmente irá ver isso na sua mão. Se você pode ver uma pequena imagem de parte da árvore em uma da caixas na parte de baixo da tela, isso significa que o bloco está no seu inventário. Estas caixas são sua hotbar. Para selecionar os diferentes itens em sua hotbar, utilize a roda do mouse ou digite os números de 1 à 8.
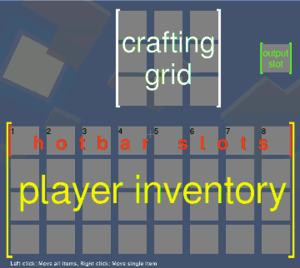
Para abrir seu inventário, pressione a tecla I em seu teclado. A tela deverá The screen should now have several rows of grey boxes on it. These are the various slots of your inventory. To move items around, left click on them with the mouse, then click where you want to put them (an empty box).
Now, break some more bits of tree. You should now see a small number next to the tree picture in your inventory. This indicates how many pieces of tree you have.
When you open your inventory, you will see a 3×3 box of squares at the top. This is the crafting grid. It is where you make the various items.
You will now need to make wooden planks. To do this, click on the logs to select them. Next, place them anywhere in the crafting grid. In a box just to the right of the grid, you will see an image of wooden planks. Click on this, and you will pick up four wooden plank blocks. You should also see a log disappear from the stack of logs in the crafting grid.
Congratulations! You have crafted your first item! You can place (almost any) block, or node as they are properly called, in your world by walking up to another node, and right-clicking on a face to put the node you are holding there.
Crafting the first tool
Before you make your house, though, there is another 2 crafts you will have to do. The first one is making sticks. Select the wooden planks in your inventory. Then, right click any one of the slots in the crafting grid. This will only place one wooden plank in there, instead of the whole stack. Then left click somewhere else in your inventory to place the remaining wooden planks there. The crafting output box should now show sticks. Click on the stick item to receive the four sticks.
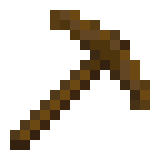
Now, for your first tool! It is called a pickaxe. It is used to mine stone and some ores. To make the wooden pickaxe, using right click, place 1 wooden plank in each of the 3 boxes at the top of the crafting grid. Next, place sticks in the center of the middle and bottom rows. The output will show a pickaxe.
Take the pickaxe, and put it at the top of your inventory. Exit the inventory, then scroll to select it. You should now appear to be holding it.
Some serious mining and crafting
Now, for stone. Walk around until you see grey nodes. These can often be seen in cliffs whilst above ground. Go up to them, and using the pickaxe, break 11 of them like you did with the tree. You will find they turned into a material called “cobblestone” in your inventory.
Next you will want to make a furnace. To craft it, fill the crafting grid with cobblestone, leaving the very centre box empty. Take the furnace from the output slot. You should have 3 spare cobblestone.
And finally, now to make a house. Build it how you like, for now just use wooden planks (Break more trees to make them). You can use this as your base. By now, it will probably be getting dark. You will need to make torches for light.
To make torches, walk around until you see what looks like stone, with black spots on it. This is coal. Break the entire cluster of coal with your pickaxe, it won’t take long.
Next, make some more sticks. At the bottom of the crafting grid put a stick in one of the boxes, then put a coal lump (this is what you get when you mine coal) above it. You will get four torches. Place these like regular nodes, and they will emit light. Use these to light up your house.
Place your furnace somewhere in your house. You will use the furnace to smelt ores, once you mine them. But don’t worry about that yet.


